Introduction
Kubernetes has been growing in popularity to orchestrate deployments using containers. While there are a lot of good tutorials and writing material available on how what is Kubernetes or how the internal work, this guide is primarily aimed towards developers who want to get their application up and running on a Kubernetes cluster and further extending the same approach to handle production deployments.
In this guide, we'll talk about how to deploy a real-world OSS application listmonk on Kubernetes which is an open-source + self-hosted mailing list manager to send campaigns/newsletters. While deploying the application on the K8s cluster, we will develop a basic foundation that would help you to get started with Kubernetes. Some of the broader topics we'll learn:
- Building containers and deploying in a local cluster
- Connecting app with a database which is also deployed in K8s
- Handling one-off tasks like DB migrations
- Structuring manifests using
kustomize - Managing config and secrets for your applications
Target Audience
The guide intends to demonstrate how to deploy an application to a Kubernetes cluster running locally. The idea behind doing this is to show an example that demonstrates a deployment pattern that can be extended to handle a production deployment as well. This will be most helpful for developers in organizations where the bridge between a traditional Ops team and a developer is slim or non-existent.
What this guide is not
It is not intended to be a tutorial or a course on how Kubernetes works. There is plenty of good writing material available for that already. This guide is not about Containers or Docker as well. The purpose is rather to guide the developers to migrate the older applications on a Kubernetes cluster (or deploy new apps) and gather them with all the tools or skills required to deploy/debug changes with confidence. This guide aims to make the developers self-sufficient when it comes to deployment to Kubernetes and let that task not be seen as something which a dedicated Ops team would do.
This guide covers my experience of how I do deployments at my organisation. You may find a lot of different workflows using Helm or other tools and you are encouraged to explore what works best for you. This guide in no way tries to preach any tool or a workflow, just demonstrates what works for me and potentially could work for a lot of projects as well.
Contributions
This guide is written in an open-collaborative form, via the GitHub platform k8s-deployment-book. All contributions for future versions are most welcome, in the form of PRs and Issues.
Structure of the Guide
- We will first install all the tools required to set up a local environment which includes a local Kubernetes cluster as well.
- Then we will further explore how to create resources manifest and organize them.
- We will further look into how to deploy these changes to your Kubernetes clusters.
- As we progress and you get a fair idea of how deployments are done locally, we will demonstrate how to deploy to a local K8s cluster.
- At this point, we would have covered the deployment steps but there are some times when deployment doesn't go as planned so we will look at how to effectively debug applications using different
kubectlcommands.
You can checkout the source code for all the manifests used in this guide here.
Tools
You need the following tools for setting up the deployment workflow on Kubernetes locally.
microk8s
The smallest, fastest, fully-conformant Kubernetes that track upstream releases and makes clustering trivial. MicroK8s is great for offline development, prototyping, and testing.
We'll need a local instance of Kubernetes running so we can deploy the manifests and see if everything is running perfectly. There are a lot of options like minikube, microk8s kind etc. In this guide, we will choose microk8s because it's quite easy to set up and get all components up and running without much pain.
microk8s installs a lightweight Kubernetes cluster with bare minimum components required in the control plane. Additional add-ons can be configured with microk8s enable <addon-name>.
NOTE: I tried other alternatives as well before microk8s and here are a few reasons to not go ahead with them:
minikuberuns everything in a VM which is quite slow and resource-intensive.- A minor issue with
kindis that if you reboot your system, thedockercontainer in which the control plane runs is instoppedstate. There's nokind restartas of yet, so you'll have to re-deploy your app after recreating the cluster.
It's no biggie if you prefer another CNCF compliant K8s platform of your choice, the rest of the guide remains the same for you.
Install Instructions: microk8s.io/docs
Once you've installed microk8s, let's verify that our cluster is up.
$ microk8s.kubectl get nodes
NAME   STATUS   ROLES    AGE     VERSION
work   Ready    <none>   6m22s   v1.17.2
kubectl
Kubectl is a command-line tool for interacting with the Kubernetes API server and managing the cluster.
You can read more about kubectl here
Install kubectl
You can find instructions to install kubectl in your system here.
Configure kubectl
kubectl looks for KUBECONFIG environment variable or ~/.kube/config for path to config file. The config file consists of metadata about the cluster and the user. kubectl is a CLI wrapper for HTTP calls to the API server. As you guessed, the API has Authorization and Authentication and if you have multiple users in a cluster to manage you need kubectl to tell which user it's going to connect as. This piece of information is called a context. context holds the cluster name and user name. You can easily switch between contexts to log in as a different user or a different cluster altogether. Think of "context" as profiles. The context which is active at the moment is called current-context.
Power tools for kubectl
kubectx is a nice utility to switch between clusters and namespaces.
kubekutr
Cookie cutter templating tool for scaffolding K8s manifests
Disclaimer: This is a project which I developed after wrangling a lot of Kubernetes resource manifests by hand.
You can find more details about the project on GitHub.
Install kubekutr
You can download pre-compiled binaries for kubekutr from GitHub.
Grab the latest version from there and put it in your $PATH (e.g. to /usr/local/bin/kubekutr)
kustomize
Customization of Kubernetes YAML configurations
Install kustomize
You can find instructions to install kubectl in your system here.
Setting up a local registry
Let's pull the image of listmonk from DockerHub and tag it locally. The reason to tag an image locally is that this guide is primarily focussed on developers who will be building their apps on the local system and testing the deployment workflow on local systems, so it doesn't make sense for us to use a remote image from Dockerhub as an example.
docker pull listmonk/listmonk:v0.5.0-alpha
docker tag listmonk/listmonk:v0.5.0-alpha localhost:32000/listmonk:0.5
We should have an image localhost:32000/listmonk:0.5 available locally. You can verify the same by:
docker images --format "{{.Repository}} : {{.Tag}}" | grep localhost:32000/listmonk
Local Registry with microK8s
microk8s has an addon to enable a private Docker registry. The registry is exposed to your node on localhost:32000. You can read more about it here. This means that we can push our local images to this local registry. This comes super handy in case you want to test your local images.
To enable the local registry addon:
microk8s enable registry
In case you are wondering why microk8s isn't available to find the images built locally, it is because microk8s runs it's own containerd daemon. containerd is the container runtime used to manage images in microk8s. Docker in your system also uses containerd but these two are 2 different services running. The images you tag and build locally, only your local containerd (the one which comes with Docker) knows about it. The containerd in microk8s has no information about this. That's why we use a local registry to push the images on a local registry that contaienrd of microk8s is aware of.
Push the image to the local registry
Now that our local Docker registry is running, we simply need to push our local tagged image to this registry.
$ docker push localhost:32000/listmonk

The push refers to repository [localhost:32000/listmonk]
f2851807903a: Layer already exists
c58b6e921dd6: Layer already exists
e6e719f4def9: Layer already exists
5074c9cb3658: Layer already exists
03901b4a2ea8: Layer already exists
0.5: digest: sha256:b9f1c584e1f434eb9de92ec9d2e42da22fa41c831281d6f53888d735b2fb2bb1 size: 1365
Learning the basics
Kubernetes controllers are basically on an infinite reconciliation loop. Controllers in Kubernetes are control loops that watch the state of your cluster and if the real-world state drifts apart from the desired state, it "reacts" to those changes. Any controller in K8s tracks a particular resource spec, for example, the Deployment controller would track the Pods.
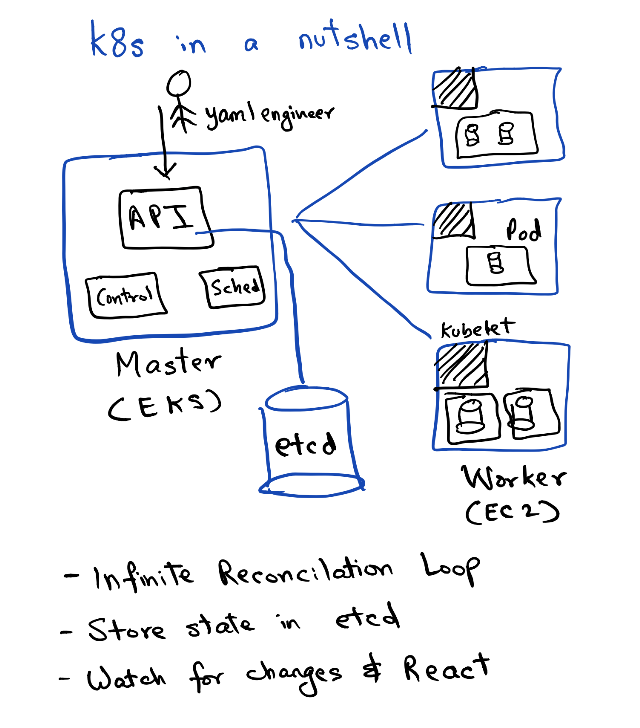
The resource spec of an object in Kubernetes describes the desired state. The desired state has some metadata about the object, the apiVersion to use (specifying K8s API version), the name of the object, etc. Once you create this object, the controller manipulates the same spec to show information about the real world state as well under the field status. The controller would continuously monitor the real and desired state and trigger an event in the API server if it notices any drift.
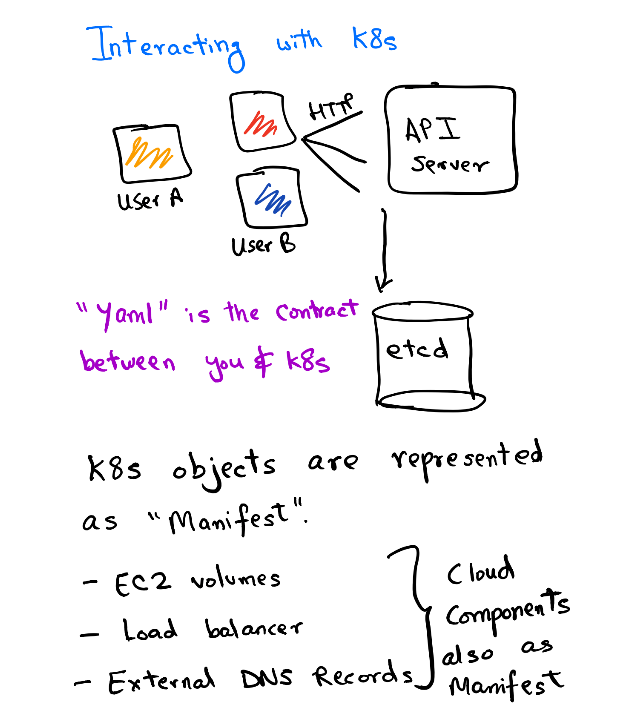
Before we begin writing down the manifest files, we must understand why knowing about this behavior is important to us. Every single object you create in K8s is created with a manifest file. This manifest file declaratively sets the config values of the objects you create.
Now, the K8s API is quite verbose and not very straightforward for developers trying it out the first time. Also for any seasoned DevOps engineer, writing these manifest files becomes a monotonous and repetitive task. This served as an inspiration to build kubekutr which helps developers scaffold these manifests files from scratch. kubekutr takes minimum supported configuration values to create a base deployment. For complex configuration use cases, we use kustomize which modify our base manifests to create variants.
Let's proceed to writing our first kubekutr configuration file here.
Understanding kubekutr config
Let's create a folder listmonk-infra to store all our manifest configuration files. We will use this as a base folder for the rest of the guide unless specified otherwise.
mkdir listmonk-infra && cd listmonk-infra
kubekutr needs to be configured with its own configuration file. To make things easier for newcomers, we have a default configuration template that can be edited according to your needs.
kubekutr init --default
You should see kubekutr.yml generated by kubekutr in the previous step. Let's edit the file with the below configuration suited for listmonk:
workloads:
  - name: listmonk # name of the project
    deployments:
      - name: app # name of the individual component
        replicas: 1
        labels:
          - name: 'app.kubernetes.io/component: app'
        containers:
          - name: app
            createService: true
            image: 'localhost:32000/listmonk:0.5'
            command: '["./listmonk"]'
            args: '["--config", "/etc/listmonk/config.toml"]'
            envSecret: app-secrets
            ports:
            - name: app-port
              port: 9000
            cpuLimits: 800m
            memoryLimits: 500Mi
            cpuRequests: 400m
            memoryRequests: 250Mi
            readinessPort: 9000
            readinessPath: /
            livenessPort: 9000
            livenessPath: /
            volumeMounts:
              - name: config-dir
                mountPath: /etc/listmonk
        volumes:
          - name: config-dir
    services:
      - name: postgres
        type: ClusterIP
        headless: true
        ports:
          - name: db-port
            targetPort: db-port
            port: 5432
        labels:
          - name: 'app.kubernetes.io/component: svc-headless'
        selectors:
          - name: 'app.kubernetes.io/component: db'
    statefulsets:
      - name: db
        serviceName: postgres
        labels:
          - name: 'app.kubernetes.io/component: db'
        containers:
          - name: postgres
            image: 'postgres:12.2-alpine'
            ports:
            - name: db-port
              port: 5432
            envSecret: db-secrets
            volumeMounts:
              - name: postgres-storage
                mountPath: /var/lib/postgres
            cpuLimits: 500m
            memoryLimits: 800Mi
            cpuRequests: 250m
            memoryRequests: 400Mi
        volumes:
          - name: postgres-storage
A quick overview
Let's break down the giant config into pieces easy to understand.
workloads
Workload represents a project/application. All of the different components of an application together form one workload.
So when we use:
workloads:
  - name: listmonk # name of the project
  ...
We are naming our workload listmonk and going to add different components like the app container, the db container, etc to it.
deployments
Before we describe Deployments object, let's first understand how Kubernetes schedules the containers. Kubernetes control plane runs a component kube-scheduler. The job of this scheduler is to talk to an agent running on different nodes (called kubelet) and figure out which node is the best to run your container depending on resource requirements.
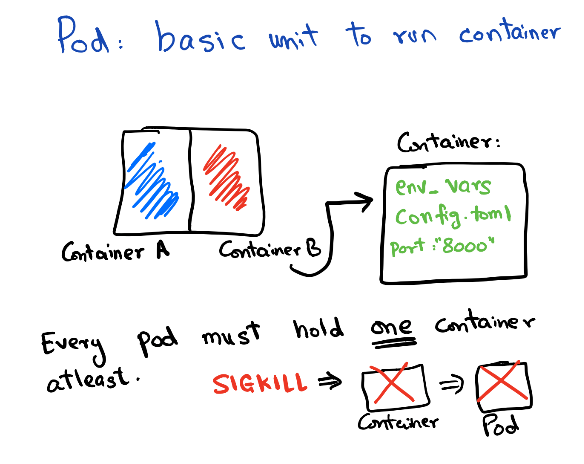
A container in Kubernetes is basically wrapped around something called Pods. So Pods contain the information about network, storage resources, volume mounts, and the Docker image/arg etc. Kubernetes manages the pod directly, not the container so any changes that the controller makes are applied at the Pod level.
Sidecars: Running a single container per pod is the most common use case, but you often may find the usage of sidecars, which means running a lightweight container in addition to your application. Multiple containers together also form one Pod. The most common use cases of sidecar are for running logging/monitoring agents or running a lightweight web proxy etc.
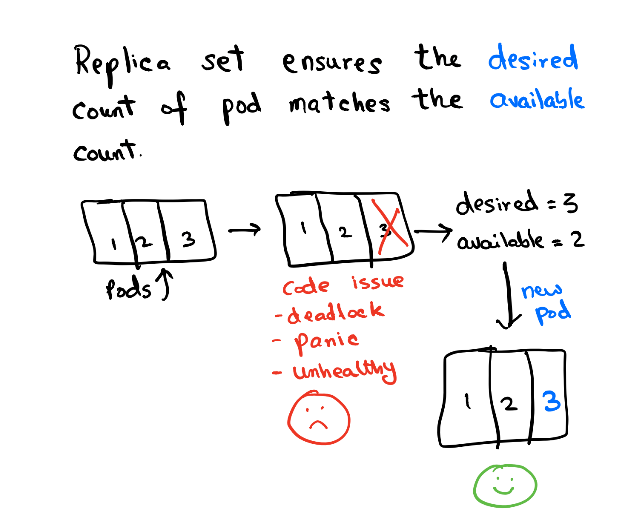
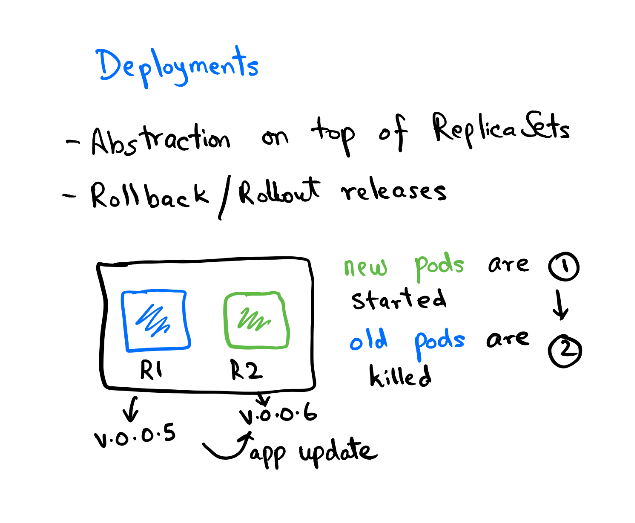
Pods are managed by Replica Set. Replica set controls the rollout/rollback of a group of pods. You can configure the rollout pattern by tweaking the RollingUpdateStrategy spec in Deployment.
The deployment contains the history of Replica sets at any point in time. The Deployment Controller changes the actual state to the desired state if there's any drift noticed.
services
Service object is used to expose your pod to other pods or to the world. There are multiple services types available for different use-cases about which you can read more here.
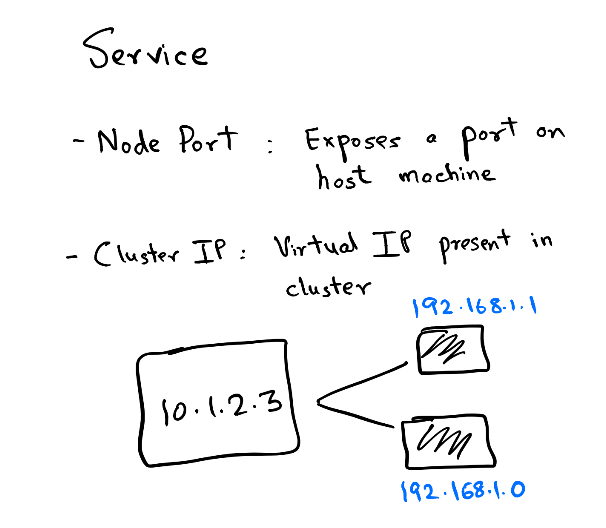
In this guide, we will use the service of type ClusterIP. Each pod exposes an IP on the cluster and there are various ways to connect this IP. But what happens if you run multiple replicas of one app? You cannot expect the client to remember n IPs for n replicas. So, when you create a Service object of ClusterIP you get a virtual IP. This Service object backs all other IPs in the form of another object called Endpoints. The endpoint object is responsible for keeping a track of all Pod IPs that the Service object connects to. Kubernetes runs a component kube-proxy which resolves the virtual IP to the actual Pod IP present in Endpoints. This selection is not round-robin and completely random so it is very much possible that you see skewed traffic across pods.
Another crucial concept in service is Labels & Selectors. While reading the above paragraph if you were thinking how does the Service object know which Pod IP to track, then the answer lies in using the field .spec.selector of the Service object.
To understand this easily, let's imagine our Deployment spec looks like:
name: listmonk
replicas: 1
...
labels:
app: listmonk
tier: web
...
image: listmonk:latest
Now, to target the Pod with labels app:listmonk and tier:web we need to create a Service object which matches the .spec.selector:
selector:
    app: listmonk
    tier: web
So, this is how using Labels and matching the equivalent values with Selectors we can target the Pods from a Service object.

Now that we have covered the broader concepts, let's start building the base manifest using kubekutr here.
Generating base with kubekutr
# cwd: listmonk-infra
$ kubekutr -c kubekutr.yml scaffold -o .

DEBU[2020-03-27T16:30:43+05:30] verbose logging enabled
INFO[2020-03-27T16:30:43+05:30] Starting kubekutr...
2020/03/27 16:30:43 reading config: kubekutr.yml
This generates a base folder in your current working directory.
$ tree .
.
├── base
│   └── listmonk
│       ├── app-deployment.yml
│       ├── app-service.yml
│       ├── db-statefulset.yml
│       └── postgres-service.yml
└── kubekutr.yml

2 directories, 5 files
Inside base a folder for each workspace is created. As mentioned earlier, workspace contains all the components of an application. The deployments and service manifests are all present here.
NOTE: Remember to not edit these files by hand, as the next time you run
scaffoldon kubekutr, the changes will be overwritten.
Now we have the base manifests ready, but we still need to bring kustomize in our toolchain to make use of this. So let's learn more about Kustomize in the next section.
Kustomize the Manifests
So far we have learned how to use kubekutr to write our base manifest files. We will need kustomize to customize the base YAML files generated by kubekutr in a template-free format.
Why Kustomize
In the previous section, we explored kubekutr to create manifests from scratch. However, when we do deployments across multiple environments there are cases where some things need to be changed based on the environment. For eg, in a local K8s cluster, since there's no cloud provisioner to create a LoadBalancer service, we need to change it to a ClusterIP or NodePort. Or if you've configured to run 10 replicas of your pod to serve high traffic with higher resource limits, but you need to change these variables in a local setup.
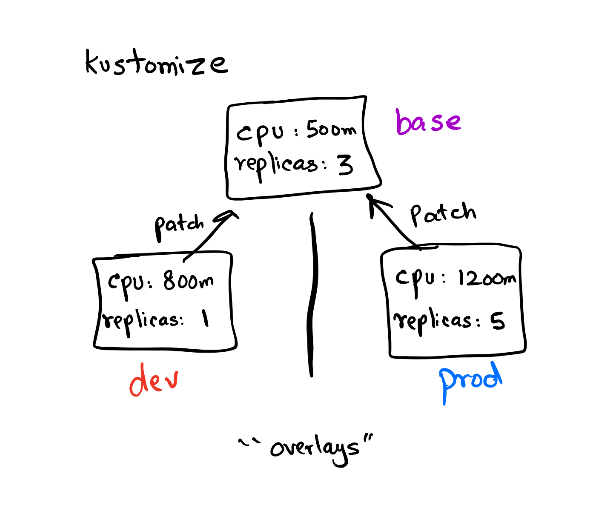
kustomize helps us with that in a template-free manner. There are no ugly if-else in our templates (conditionals in templates are bad) which also makes the output of these templates as K8s native. kustomize takes the approach where we basically combine the base and apply patch to create a variant.
For eg, we created base using kubekutr which provides a starting point for any further configurations. Then based on the environment (dev/staging/prod) we create overalys. In these overalys, we again specify the things to be changed referencing a base called patches. The changes are applied on top of the base and the resultant output is called a variant. So if we create 3 overlays referencing the same base we get 3 variants to deploy based on the environment. This approach helps us to keep the base as clean as possible and only fiddle with the values that change across environments.
Let's proceed to write our first kustomization.yml file!
Create kustomization.yml file
Create a file kustomization.yml which represents the config for kustomize to build resources etc.
# vim base/kustomization.yml
resources:
- listmonk/app-deployment.yml
- listmonk/app-service.yml
- listmonk/db-statefulset.yml
- listmonk/postgres-service.yml
First, we'll collect the resources used to build our base. These files are generated by kubekutr and we are just aggregating the resources so that when kustomize build runs, it parses all of these resources.
Note: As mentioned earlier,
kustomizetargets the root of the directory wherekustomization.yamlis present.
You can see the manifest generated with:
kustomize build base
Now that we have built our inventory for the resources required to deploy listmonk, let's proceed to create an overlay for our base deployment here.
Creating Overlays
Let's create a folder for an overlay. In this guide, we will follow the naming convention of naming the overlays folder based on the environment name. For eg, if we need an overlay for local env, we will make a directory local with kustomization.yml present at the root of this folder.
mkdir -p overlays/local
As mentioned earlier, kustomization.yml should be present in the root of the overlay folder, so let's create that:
# vim overlays/local/kustomization.yml
resources:
- ../../base

namespace: listmonk-local

# Common Prefix to be applied to all resources
namePrefix: listmonk-
nameSuffix: -local
# Common Labels applied to all resources
commonLabels:
  app.kubernetes.io/managed-by: team-listmonk

configMapGenerator:
  - name: app-config
    files:
      - config.toml=configs/config.toml

secretGenerator:
  - name: app-secrets
    literals:
      - LISTMONK_db__host=listmonk-postgres-local
  - name: db-secrets
    literals:
      - POSTGRES_PASSWORD=listmonk
      - POSTGRES_USER=listmonk
      - POSTGRES_DB=listmonk
In the above configuration we make use of kustomize field spec to apply certain changes:
- resources: This references the
basewe created in the previous step. Without abasean overlay is useless since it has nothing to target. - namespace: Name of the K8s namespace, where all resources will be deployed.
- namePrefix: Prepends
listmonk-to each resource name. - nameSuffix: Appends
-localto each resource name. - commonLabels: Applies a set of same labels to each resource.
- configMapGenerator: List of
configmapsto be generated. Here, we use a file generator to create the ConfigMap object for us. - secretGenerator: List of
secretsto be generated. Here, we rely on environment variables to create a secret.
You can read more about the kustomization.yml field spec in the official docs.
Generating ConfigMap
kustomize lets us build a ConfigMap object from raw files, literal strings or environment variables. Since listmonk expects a config.toml configuration to start the application, we will use the configMapGenerator for the same.
# vim overlays/local/kustomization.yml
configMapGenerator:
  - name: app-config
    files:
      - config.toml=configs/config.toml
In the field files, the key (config.toml) is the key used in ConfigMap while mounting the volume. For eg, in our kubekutr.yml we mentioned the following information for the Deployment spec:
volumeMounts:
  - name: config-dir
    mountPath: /etc/listmonk
This basically mounts all the keys present in config-dir ConfigMap object inside /etc/listmonk directory. In our case, we only have one file config.toml though.
We will need to place the sample config file for listmonk so that kustomize can create the object:
mkdir -p overlays/local/configs
# vim overlays/local/configs/config.toml
[app]
# Interface and port where the app will run its webserver.
address = "0.0.0.0:9000"

# Public root URL of the listmonk installation that'll be used
# in the messages for linking to images, unsubscribe page, etc.
root = "https://listmonk.mysite.com"

# (Optional) full URL to the static logo to be displayed on
# user facing view such as the unsubscription page.
# eg: https://mysite.com/images/logo.svg
logo_url = "https://listmonk.mysite.com/public/static/logo.png"

# (Optional) full URL to the static favicon to be displayed on
# user facing view such as the unsubscription page.
# eg: https://mysite.com/images/favicon.png
favicon_url = "https://listmonk.mysite.com/public/static/favicon.png"

# The default 'from' e-mail for outgoing e-mail campaigns.
from_email = "listmonk <from@mail.com>"

# List of e-mail addresses to which admin notifications such as
# import updates, campaign completion, failure etc. should be sent.
# To disable notifications, set an empty list, eg: notify_emails = []
notify_emails = ["admin1@mysite.com", "admin2@mysite.com"]

# Maximum concurrent workers that will attempt to send messages
# simultaneously. This should depend on the number of CPUs the
# machine has and also the number of simultaneous e-mails the
# mail server will
concurrency = 100

# The number of errors (eg: SMTP timeouts while e-mailing) a running
# campaign should tolerate before it is paused for manual
# investigation or intervention. Set to 0 to never pause.
max_send_errors = 1000


[privacy]
# Allow subscribers to unsubscribe from all mailing lists and mark themselves
# as blacklisted?
allow_blacklist = false

# Allow subscribers to export data recorded on them?
allow_export = false

# Items to include in the data export.
# profile            Subscriber's profile including custom attributes
# subscriptions      Subscriber's subscription lists (private list names are masked)
# campaign_views     Campaigns the subscriber has viewed and the view counts
# link_clicks        Links that the subscriber has clicked and the click counts
exportable = ["profile", "subscriptions", "campaign_views", "link_clicks"]

# Allow subscribers to delete themselves from the database?
# This deletes the subscriber and all their subscriptions.
# Their association to campaign views and link clicks are also
# removed while views and click counts remain (with no subscriber
# associated to them) so that stats and analytics aren't affected.
allow_wipe = false


# Database.
[db]
host = "demo-db"
port = 5432
user = "listmonk"
password = "listmonk"
database = "listmonk"
ssl_mode = "disable"

# Maximum active and idle connections to pool.
max_open = 50
max_idle = 10

# SMTP servers.
[smtp]
    [smtp.my0]
        enabled = true
        host = "my.smtp.server"
        port = "25"

        # cram | plain | empty for no auth
        auth_protocol = "cram"
        username = "xxxxx"
        password = ""

        # Optional. Some SMTP servers require a FQDN in the hostname.
        # By default, HELLOs go with "localhost". Set this if a custom
        # hostname should be used.
        hello_hostname = ""

        # Maximum time (milliseconds) to wait per e-mail push.
        send_timeout = 5000

        # Maximum concurrent connections to the SMTP server.
        max_conns = 10

    [smtp.postal]
        enabled = false
        host = "my.smtp.server2"
        port = "25"

        # cram or plain.
        auth_protocol = "plain"
        username = "xxxxx"
        password = ""

        # Maximum time (milliseconds) to wait per e-mail push.
        send_timeout = 5000

        # Maximum concurrent connections to the SMTP server.
        max_conns = 10

# Upload settings
[upload]
# Provider which will be used to host uploaded media. Bundled providers are "filesystem" and "s3".
provider = "filesystem"

# S3 Provider settings
[upload.s3]
# (Optional). AWS Access Key and Secret Key for the user to access the bucket. Leaving it empty would default to use
# instance IAM role.
aws_access_key_id = ""
aws_secret_access_key = ""
# AWS Region where S3 bucket is hosted.
aws_default_region="ap-south-1"
# Specify bucket name.
bucket=""
# Path where the files will be stored inside bucket. Empty value ("") means the root of bucket.
bucket_path=""
# Bucket type can be "private" or "public".
bucket_type="public"
# (Optional) Specify TTL (in seconds) for the generated presigned URL. Expiry value is used only if the bucket is private.
expiry="86400"

# Filesystem provider settings
[upload.filesystem]
# Path to the uploads directory where media will be uploaded. Leaving it empty ("") means current working directory.
upload_path=""
# Upload URI that's visible to the outside world. The media uploaded to upload_path will be made available publicly
# under this URI, for instance, list.yoursite.com/uploads.
upload_uri = "/uploads"
Note:
kustomizeappends a random hash string to the name ofConfigMaporSecretobject if their content changes, thus triggering a new deployment automatically. A feature that K8s still doesn't have and people resort to hacks like these even in Helm :). Be careful about garbage collection with this as old ConfigMaps and Secret objects need to purged to not take up ever increasing space in youretcdcluster.
Building the overlay
At this point, we can test that our overlay works correctly by building it:
kustomize build overlays/local
You should see an output of all manifest files aggregated with our customisations applied on the base. Let's proceed on how to create a patch here
Applying patches
A very important and crucial feature of kustomize is its ability to create different variants of our deployment without templating using patches.
patchesStrategicMerge applies patches to list of resources which are matched by some unique identifier (Group/Version/Kind + Name/Namespace). The patch contains only a sparse resource spec, omitting the fields that are already defined in the base.
For eg, to change a replica count in Deployment, we will omit all other fields and only have this field listed in the resource spec.
# vim example-increase-replica.yml
---
apiVersion: apps/v1
kind: Deployment
metadata:
  name: app
  labels:
    tier: api
spec:
  replicas: 1
This patch targets an object of kind Deployment with apiVersion apps/v1 and name as app with labels tier:api set. As you can see we only mention the fields that we have to replace which is .spec.replicas. kustomize will see the patch and only merge the replicas YAML key with the old manifest. So, in effect only replicas key is changed in the manifest, everything else remains the same.
Now that the basics of how a patch works are covered, let's take a look at how we'll use patchesStrategicMerge to fill some gaps by kubekutr.
Going back to kubekutr.yml, we had mentioned the volume mount in the deployment field. listmonk requires a config.toml to source config variables for the app to run. Since volume can be of multiple types and by design kubekutr sticks to a very generic and base config format, specifying the type of volume isn't possible in kubekutr as of yet.
No worries, we will use kustomize to add any such missing fields.
mkdir -p base/patches
# vim base/patches/add-config-volume.yml
---
apiVersion: apps/v1
kind: Deployment
metadata:
  name: app # Targets the deployment with `name:app`
spec:
  template:
    spec:
      volumes:
        - name: config-dir
          configMap:
            name: app-config
Let's add this patch to our inventory defined in base/kustomization.yml:
# vim base/kustomization.yml
patchesStrategicMerge:
  - patches/add-config-volume.yml
This will tell kustomize to look for a patch present in patches/ directory and apply the patch.
This was all about patches that you needed to know. There are some other strategies for patches to apply in kustomize like patchesJson6902 and patches. You can explore them on your own as it is out of scope for this guide.
Verifying the patch
Now we can test that our overlay along with patches works correctly by building it:
kustomize build overlays/local
On inspecting the Deployment spec from the output, we can see the volume configured correctly:
        volumeMounts:
        - mountPath: /etc/listmonk
          name: config-dir
      volumes:
      - configMap:
          name: listmonk-app-config-local-67m56g98mm
        name: config-dir
An interesting thing to note here is that kustomize applies a random hash to the ConfigMap object name as we can see in the above example (listmonk-app-config-local-67m56g98mm). You can see that the ConfigMap object is created with the same name.
If you're wondering where this is useful, imagine a use-case where let's say the ConfigMap name is listmonk-app-config and you change the ConfigMap contents. You'd imagine the app to be restarted for any config changes, but the Deployment controller doesn't track the ConfigMap updates. So since the name is the same in the new ConfigMap (listmonk-app-config), just that the contents have changed, the new Deployment is not rolled out.
kustomize appends a random hash to the ConfigMap name and whenever the contents of the ConfigMap change, the hash is also changed. Since the name of ConfigMap object itself is changed in the Deployment spec, the controller notices the change and schedules a rollout of the new pods with the updated config.
This is just one of the many benefits kustomize provides over mangling resources by hand. I hope by now you're seeing the benefits of using kustomize and wanting to start using this in your toolchain.
Deploying our App
A quick recap
Let's take a moment to recap the things we have covered so far.
- Created a base manifest using
kubekutr. - Applied patches to the base for configuring the volume mount.
- Created overlays for
localenvironment withkustomize. - Used
configMapGeneratorandsecretGeneratorto create these native objects from raw resources.
We are pretty close to a full-fledged deployment of Listmonk. A few more things that we need to cover:
- Creating a Job:
Jobobject helps us to run one-off tasks like DB Migrations, pulling assets from S3, etc. - Adding Persistent storage:
Persistent Volumehelps us back the storage to a Pod which is necessary for stateful workloads like Databases etc. - Running on microK8s: We will aggregate all the resources and apply the changes to the cluster.
Creating a Job
listmonk requires us to do the DB migrations before the app can run. The DB migrations are responsible for loading the schema in the Postgres database. Since this is a one-off task, Kubernetes provides a way to run such tasks by creating a Job object.
Since at the time of writing this guide kubekutr doesn't have support for Jobs/CronJobs, we can create a raw resource ourselves.
# vim base/add-db-migration.yml
apiVersion: batch/v1
kind: Job
metadata:
  name: db-init
spec:
  template:
    spec:
      containers:
      - name: listmonk-db-init
        image: localhost:32000/listmonk:0.5
        command: [sh, -c, "yes | ./listmonk --install"]
        envFrom:
          - secretRef:
              name: app-secrets
      restartPolicy: Never
  backoffLimit: 5
  ttlSecondsAfterFinished: 10
  activeDeadlineSeconds: 100
When the Job object is applied to the cluster, a Pod is created. Just like how Deployment targets the Pod with ReplicaSet, Job manages the state of the Pod. Retry for a job or parallel scheduling can all be controlled with the Job spec about which you can read more here.
Every time we add a resource, we must remember to add it to our inventory, which is defined in kustomization.yml.
# vim base/kustomization.yml
resources:
...
- add-db-migration.yml
...
Since this resource is now added to our inventory, all our customisations will be applied to the Job object as well.
Note: Always remember to add resources to
kustomization.ymlfile to keep your inventory up to date. Not doing so, would mean that those resources would be skipped out when building the manifests.
Adding storage to DB
Since listmonk relies on Postgres as it's storage backend to store email campaigns data, subscriber details, etc we need to attach a Persistent Volume to the pod running the DB. Many cloud providers have plugins baked in the storage provisioner (mentioned via StorageClass) but since we are doing a local deployment, we will make use of hostpath provisioner to create storage backed by the node on which the pod is running:
# vim base/add-db-volume.yml
apiVersion: v1
kind: PersistentVolume
metadata:
  name: postgres-storage
  labels:
    app.kubernetes.io/component: storage
spec:
  storageClassName: microk8s-hostpath
  capacity:
    storage: 1Gi
  accessModes:
    - ReadWriteOnce
  hostPath:
    path: "/mnt/data"
And like always, let's add this to the inventory:
# vim base/kustomization.yml
resources:
- add-db-volume.yml
Deploying on microk8s
Now that the preflight changes have been done, let's take a look at how we will deploy to microK8s.
Kubernetes has an API server deployed in its control plane. This API server is responsible for making changes in the cluster. The API server is like the gateway to your cluster and all the updates can be managed with this. kubectl is a nifty wrapper for making HTTP calls to this API. In this section, we'll see how we declaratively apply changes to our cluster to get our app running.
Step 1: Create a namespace
We need to create a namespace object. Namespace refers to a virtual cluster in Kubernetes. Since Kubernetes is a multi-tenant platform where multiple workloads are deployed, we need a layer of separation. Namespace acts as a virtual separation but remembers it does not mean isolation in terms of scheduling. You can set resource limits to a namespace, manage all the resources of an app collectively with one namespace, set network policies on the namespace, etc, set proper RBAC for teams to access a particular Namespace and restrict their actions as well.
Note: If you don't specify any namespace,
defaultnamespace is used. In production clusters, this is a very bad idea as you don't want to mix arbitrary workloads under one namespace.
# vim overlays/local/namespace.yml
apiVersion: v1
kind: Namespace
metadata:
  name: listmonk-local
# cwd listmonk-base-deployment
microk8s.kubectl apply -f overlays/local/namespace.yml
A namespace should have been created with the name listmonk-local. You can verify the same if it's created by:
microk8s.kubectl get namespace
Step 2: Build and apply manifest
kustomize build overlays/local | microk8s.kubectl apply -f -
The resources are now applied in the cluster. You can see the status of pods by:
$ microk8s.kubectl get pods -n listmonk-local
NAME                       READY   STATUS    RESTARTS   AGE
api-dev-5954dbc8fb-2242w   1/1     Running   0          4d
api-dev-5954dbc8fb-99vwx   1/1     Running   0          4d
api-dev-5954dbc8fb-nbm7j   1/1     Running   0          4d
Step 3: Verifying the changes
Get the pod status
microk8s.kubectl get pods -n listmonk-local
Get deployment logs
microk8s.kubectl logs deployment/listmonk-app-local -n listmonk-local

2020/03/28 09:36:12 main.go:89: reading config: /etc/listmonk/config.toml
2020/03/28 09:36:13 init.go:209: loaded SMTP: my0 (xxxxx@my.smtp.server)
2020/03/28 09:36:13 init.go:197: skipped SMTP: postal
⇨ http server started on [::]:9000
Yay! We can see listmonk is running successfully in the logs.
Get Service details
microk8s.kubectl get service -n listmonk-local
Note: It's important to use
--namespace/-nflag with everykubectlcommand if you don't set the namespace in yourcurrent-context. By default, thedefaultnamespace is set in thecurrent-context, so you can set it tolistmonk-localto avoid passing the flag-nfor your convenience too.
Further Steps
You can explore other kubectl commands here.
Head over to read the final note.
A final word
Now that our application is running in Kubernetes successfully, we can go on to do better things in life. Like make a nice coffee, water the plants or send emails with Listmonk :).
Check out the Additional Resources section to find more resources that will help you with your Kubernetes journey.
This guide will be continuously updated to add more resources and tutorials to help make migration to Kubernetes seamless. If you're interested in contributing, head over to mr-karan/k8s-deployment-book and propose changes by sending PRs/Issues.
You can checkout the source code for all the manifests used in this guide here.
Thanks for reading till here.
Additional Resources
- The Illustrated Children’s Guide to Kubernetes
- Phippy Goes to the Zoo
- Kubernetes basics
- Kubernetes 101: Pods, Nodes, Containers, and Clusters
If you think I missed out on a great resource that deserves to be present here, feel free to send a PR for the same here.